Çözüldü : Windows 10 wifi şifresi girilmiyor klavye basmıyor , arama çubuğunda başlat menüsünde klavye yazmıyor


Windows 10 wifi şifresi girilmiyor klavye basmıyor , arama çubuğunda başlat menüsünde klavye yazmıyor Sorununun Çözümü


Windows 10 Wifi Şifresi ve Arama Çubuğuna Yazamıyorum

Windows 10 Wifi Şifresi ve Arama Çubuğuna Yazamıyorum

Windows 10'da bazen wifi şifresi giriş ekranında yada alttaki arama bölümüne bir şey yazmak istenildiğinde sanki klavye çalışmıyormuş gibi bir durum meydana gelebilir. Bunun aslında çok kolay bir çözümü var.

Windows logosuna sağ tıklayıp çalıştır deyin yada Win+R tuşuna basın Çalıştır bölümü açılınca Regedit yazarak kayıt defteri düzenleyicisini açın.

HKEY_LOCAL_MACHINE > SOFTWARE > Microsoft > Windows > CurrentVersion > Run kısmına gelin.

Sağ tıklayarak yeni dize oluştur deyin ve dize ismine ctfmon.exe yazın. Değer verisine ise "C:\Windows\system32\ctfmon.exe" yazın.

Tamam deyip bilgisayarı yeniden başlatın.

Artık sorununuz düzelmiş olmalı ve bu bölümlere klavye ile yazabilmeniz gerekir.

Acrobat Reader api-ms-win-crt-runtime-l1-1-0.dll Hatası Çözümü

Acrobat Reader api-ms-win-crt-runtime-l1-1-0.dll Hatası Çözümü

Adobe Products api-ms-win-crt-runtime-l1-1-0.dll Hatası Çözümü


Aşağıdaki Dosyayı Yükleyin Sorun Çözülüyor

visual c++ redistributable

Visual Studio 2015 için Visual C++ Paketini Yükleyin


https://www.microsoft.com/tr-TR/download/details.aspx?id=48145

[çözüldü] "internet Explorer Çalışmayı Durdurdu” Kesin Çözümü


1. YÖNTEM


Denetim Masası > Ağ ve Internet > Internet Seçenekleri > Gelişmiş > Hızlandırılmış grafikler > GPU ile görüntüleme yerine yazılım ile görüntüleme kullan* seçeneğini işaretliyoruz.


2. YÖNTEM

Başlat > Tüm Programlar > Donatılar menüsüne gidin ve Sistem Araçları’ndan Internet Explorer (Eklenti yok)’u seçin. Şimdi tarayıcının Araçlar menüsüne girin, “Eklentileri yönet”e tıklayın
Buradaki eklentileri devre dışı bırakarak hangi eklentinin sorun oldugunu tespit edebilirsiniz.

3. YÖNTEM

Araçlar /internet Seçenekleri / Sıfırla seçeneği ile Explorer ayarlarını sıfırlayın.
Bu 3 yöntemden biri ile sorununuz muhtemelen çözülecektir. Çözemezseniz yorum atın tekrar yardımcı olmaya çalışırım. Kolay gelsin arkadaşlar.

4. YÖNTEM

Reset Internet Explorer settings Fix Dosyasını indirin ve çalıştırın. Yazılım explorer ayarlarınızı sıfırlayacaktır.

PfSense FreeRadius ve Captive portal kurulumu

PfSense FreeRadius ve Captive portal kurulumu

PfSense_FreeRadius
Merhaba Arkadaşlar,
Bu gün kü komuzuda PfSense üzerinde FreeRadius kurulumu ve yapılandırmasını inceliyor olacağız.
Bu makalemizde ;
  • -Radius Server Nedir
  • -FreeRadius nedir pfsense üzerine nasıl kurulur ve nasıl configure edilir
  • -FreeRadius Kurulumu ve Captive portal Entegrasyonu nasıl yapılır.
  • -FreeRadius üzerinde oluşturduğumuz kullanıcılara download/upload kota,mac filtreleme… gibi uygulamaları uygulayarak test edeceğiz.
Öncelikle konumuza bir giriş yapalım ve inceleyeceğimiz serverın ne olduğundan başlayalım.

Radius Server Nedir :
            RADIUS  (Remote Authentication Dial-iUser Service) Livinstone Enterprise tarafından geliştirilmiş bir protokoldür. RADIUS istemci-sunucu modeli tabanlıdır ve mesaj değişimi UDP protokolü ile gerçekleşir.FreeRADIUS dünyada en çok tercih edilen açık kaynak kodlu RADIUS serverdır. Dünya üzerindeki birçok ISP firması RADIUS server olarak FreeRADIUS kullanmaktadır.
RADIUS client-server modeli tabanlıdır ve mesaj değişimi UDP protokolü ile gerçekleşir. Network Access Server (NAS), RADIUS kullanıcısı olarak davranır ve kullanıcı isteğini RADIUS server’a aktarır. Diğer RADIUS kullanıcıları wireless access point, routerler, ve switchler olabilir. RADIUS server kullnıcılardan istek aldıktan sonra için authentication, authorization, and accounting (AAA)işlemlerini gerçekleştirir. RADIUS (Remote Authentication Dial-in User Service) sunucular uzaktan bağlanan kullanıcılar için kullanıcı ismi-şifre doğrulama (authentication), raporlama/erişim süresi (accounting) ve yetkilendirme (authorization) işlemlerini yapar Kullanıcı ve server arasındaki iletişim private key ile şifrelendirilmiş şekilde gerçekleştirilir, bu sayede şifre asla network üzerinden gönderilmez. Kullanıcı ve serverlar iletişim olmadan önce bu güvenlik yöntemine göre konfigure olmuştur, ve eğer şifreler uyuşmazsa bağlantı sonlandırılır. RADIUS serverlar farklı databaseler’e (örneğin SQL, LDAP) entegre edilebilir authentication methodları kullanır.
            Örneğin işyeri dışından şirket ağına bağlanmak için bu yapı kullanılabilir, kullanıcılar tek tek yetkilendirilebilir .Daha çok internet servis sağlayıcıları tarafından kullanılsalar da, kendi kullanıcılarına hesap açma ve yetkilendirme yapabilmek için merkezi bir kontrol kurulmak istenen tüm ağlarda kullanılabilir. Geniş Wi-Fi (kablosuz) ağlarda da sıklıkla kullanılır.
            RADIUS serverler authentication/authorization işlemini yapar. RADIUS’un kendi lokal veritabanına ya da external veritabanına sahip olabilir. Lokal veri tabanında ki kullanıcılara native users (yerli kullanıcılar) denir.
RADIUS serverlar proxy server olarak da davranabilir, yani RADIUS server gelen istekleri başka RADIUS server’a iletip gelen cevabı RADIUS kullanıcısına geri iletebilir. Proxy server olarak davranabilmesi 2 ayrı internet sağlayıcısının bir birleri ile bağlantı kurmasını sağlar. RADIUS standartı ilk olarak authentication ve accounting paketleri için UDP 1645 ve 1646 portlarını kullanır. Fakat daha sonra RADIUS standart grubu 1812 ve 1813 portlarını atadı, fakat hala daha bir çok şirket 1645/1646 protlarını kullanır. RADIUS IPv6 desteği bulunmaktadır.
RADIUS, UDP protokolü üzerine dayalıdır. Bu makalemizde 1812-1813 nolu UDP portlarını kullanacağız.
RADIUS için geliştirilmiş özgür yazılımlardan biri FreeRADIUS. Bu yazılımla yapabileceklerinizin bir kısmı şöyle:
  • Kişi bazında yetkilendirme yapılabilir.
  • Gruplar tanımlanıp, farklı erişim hakları verilebilir.
  • Yapılan girişlerin kaydı tutulabilir.
  • Sisteme o an bağlı kullanıcı listesini gösterebilir.
  • Tek kullanıcının aynı anda iki bağlantı yapması engellenebilir. Bunu Captive portalda yapamazsınız !
  • Proxy kullanımını destekler
FreeRADIUS, şu işletim sistemleri üzerinde çalışabiliyor :AIX, Cygwin, FreeBSD, HP-UX, Linux (CentOS, Debian, Mandriva, RedHat, SUSE, Turbolinux, Ubuntu), Mac OSX, NetBSD, OpenBSD, OSF/Unix, Solaris.
Freeradius_diagram
Artık Kurulum için yapılandırmaya geçebiliriz.
1-)İlk olarak pfsense Serverımıza FreeRadius2 Paketi kuruyoruz bunun için
System –> Package seçeneği takip ediyoruz ve ubrada FreeRadius2 paketini bulup kurulumunu yapıyoruz.
FreeRadius_01
Bu işlemden sonra Services menüsü altında FreeRadius Seçeneğini göreceksiniz eğer sisteminizde hemen bu menü altında yer almadıysa pfsense firewallınızı restart ediniz.
2-) Öncelikle Proxy Serverımızın ayarlarının aşağıdaki gibi olduğunu kontrol ediyoruz.
FreeRadius_02
Access Control sekmesinde Subnet bilgimizin aşağıdaki gibi göründüğünden emin olalım.
FreeRadius_03
Proxy Serverımızın bu ayarlarını yapılandırdıktan sonra makinemizin internete çıkıp çıkmadığını kontrol edelim eğer internetimiz sorunsuz şekilde çalışıyorsa aşağıdaki adımları takip edebiliriz.
3-)  Servers –>FreeRadius Seçeneğini seçerek Radius serverımızı yapılandırmaya geçiyoruz. Aşağıdaki şekilde Loglama seçeneklerini enable ederek devam ediyoruz
FreeRadius_04
Sayfanın en altındaki Enable Plain MAC Auth kutucuğunu aktif hale getiriyoruz. Diğer bölümler ile ilgili bir değerde değişiklik yapmıyoruz bu haliyle kayıt ediyoruz.
FreeRadius_05
4-)FreeRadius –> Interfaces tabına geçiyoruz ve + ya basarak Radius serverımızın kullandığı portları açıyoruz.
FreeRadius_06
Authentication ve Acaunt doğrulaması için bize önerilen 1812-1813 portlarını açıyoruz
FreeRadius_07
5-)Server–>Captive Portal Seçeneğini takip ediyorum ve captive portal için bir zone tanımlıyorum(Bir önceki makalede bu adımı anlatmıştım.) ve Captive portalı enable ediyoruz.
FreeRadius_08
Status –> Services diyerek çalışmakta olan servislerimizi görüntülüyoruz.
Burada captiveportal servisimizin çalıştığını görüyoruz birazdan captive portal için Radius server üzerinde tanımlama yapacağız.
FreeRadius_09
6-)FreeRadius –>NAS/Clients sekmesine geliyoruz ve aşağıdaki gibi
Client ip address: Bu bölüme Pfsense firewall sunucunuzun ip adresini
Client Shortname: Bu kısmada az önce yukarıda çalışırlığını gördüğümüz captiveportal serverın adını
Client Shared Secret : Bu bölümeyse içerisinde tr karakter olmayan bir şifre giriyoruz.
FreeRadius_10
Bu işlemi yaptıktan sonra Save diyerek kayıt ediyoruz. 
7-) Sıra Radius Server için User(Kullanıcı) Hesabı oluşturmaya geldi bu kısım da oluşturduğunuz kullanıcı ile ilgili bir çok şeyi kısıtlayabilmektesiniz şimdi kullanıcı ile ilgili olan bölümleri inceleyelim.
FreeRadisu –>User tabındayken sağdan + butonuna basıyoruz ve yeni bir user ekleme ekranı geliyor karşımıza.
Aşağıdaki ekranda
FreeRadius_11
GENERAL CONFIGURATION
Username :kullanıcı adı tanımlanacak
Password : kullanıcı hesabı için bir parola belirliyoruz
Password encryption : şifreleme formatını dilerseniz buradan değiştirerek MD5 yapıp 128 bitlik bir şifrelemede verebilirsiniz.
Enable one-Time : seçeneğini seçerseniz bu kullanıcı hesabı bu parola ile sadece bir kez internete giriş yapabilecek anlamına gelmektedir. Bu seçeneği enable ettiğinizde aşağıdaki
İnit-Secret , PIN , Time Offset seçenekleri aktif olmaktadır.
MISCELLANEOUS CONFIGURATION
Number of simultaneous connections : Bu seçenek ile bu hesap bilgilerini kullanarak aynı anda kaç kullanıcının internet kullanabileceğini belirliyoruz.
Redirection URL :buraya girdiğiniz site http://www.serdarbayram.net formatında site adı girerek internete çıkmak isteyen kullanıcıları ilk olarak bu sayfaya yönlendirmiş olursunuz
Description : burahya ise user hakkında açıklama girebilirsiniz.
FreeRadius_12
TIME CONFIGURATION
Expiration Date :Buraya Kullanıcı hesabının en son hangi tarihe kadar kullanılabileceği bilgisini giriyoruz.
  Ör: Nov 12.2014 gibi bize belirttiği formatta girmeliyiz.
Session Timeout : Kullanıcı Belirtilen süre kadar internet kullanabilir
Possible Login Times :Burada bize belirtmiş olduğu formatta kullanıcının hangi günler hangi saatler arası internete girebileceğini belirlememize olanak sağlar.
Amount of Time :Kullanıcı hesabı için buraya girilen dakika kadar sonra bağlantıyı keser kullanıcı tekrar kullanıcı bilgileri ile giriş yapmak durumunda kalır.
Time Period :Bu bilgileri günlük haftalık aylık olarak belirleyebilirsiniz:
Ör: kullanıcıya günlük 2 saat internete girme hakkı tanıdınız buraya weekly yaparsanız haftada 2 saat internet kullanma hakkı olacak gibi düşünebilirsiniz.
TRAFFIC AND BANDWIDTH
Amount of Download and Upload Traffic : Buraya kullanıcı hesabı için upload ve download kotaları koyabilirsiniz gireceiniz değer MB cinsinden olmalıdır.
Time Perio : Bu bilgileri günlük haftalık aylık olarak belirleyebilirsiniz.
Maximum Bandwidth Dow : Max Dowlod kotasını belirleyebilirsiniz.
Maximum Bandwidth Up : Max Ipload kotasını belirleyebilirsiniz.
8)Radius serverımız üzerinde kullanıcı hesabımızı tanımladık ve şimdi Server –> Captive Portal seçeneğine gidelim ve Captive portal üzerinde Raius Server ayarlarını yapılandıralım.
Captive portalımızı açıyoruz ve Authentication Bölümüne geliyoruz.
FreeRadius_13
İp address : bu kısma Radius serverın ip adresini giriyoruz
Shared secret : buraya ise Radius server da belirlemiş olduğumuz paylaşım anahtarını giriyoruz.
Secondary Authentication Source bölümünde eğer 2. Bir Radius serverınız yok ise bu alanı boş bırakıyorsunuz.
FreeRadius_14
Sayfanın al kısımlarını resimde sarı ile işaretlenmiş bölgeleri dikkate alarak düzenliyoruz.
Radius Options bölümünde
Mac Authentication secret için : Radius serverda belirlemiş olduğumuz şifreyi giriyoruz.
Radius NAS IP attribute : bölümünde local ip adresimizi giriyoruz
Mac Address formatında ise ietf formatını seçmemiz gerekiyor bu formatta mac adreslerini “-“(çizgi) ile ayırıyoruz.
9-) Artık Radius serverımız için gerekli adımlarımızı tamamladık şimdi ağımızdaki bir makineden internete çıkmayı denediğimizde bizi captive portal login sayfası karşılıyor.
Buraya Radius server da oluşturmuş olduğum misafir kullanıcısı ile giriş yapıyorum
FreeRadius_15
Captive portal bizi yönlendiriyor.
FreeRadius_16
Evet Artık Captive portal ve Rradius server kimlik doğrulamasından geçerek internete çıkabiliyoruz.
FreeRadius_17
Şimdi Captive portal monitoring ekranına bakarak kimlerin internet kullandığını görüntüleyelim.
FreeRadius_019
Ekran görüntüsünde gördüğünüz gibi artık internete çıkan tüm kullancıların
  • ip adreslerini
  • Mac Adreslerini
  • Kullanıcı isimlerini
Görüntüleyebilmekteyiz bağlantısını kesmek istediğiniz kullanıcıyı bağlantının karşısındaki çarpı butonuna basarak sistemden atabilirsiniz.
10-) Eğer kullanıcıların internete çıkarken captive portal karşılama adresi ile karşılaşmadan nete çıkmalarını istiyorsanız! 
Bu işlem için Mac authentication yapmamız gerekiyor;
ilk olarak kullanıcının captive portal üzerinden adına bakıp mac adresini bir yere not ediyoruz  ve daha sonra 
Server –>Free Radius –> Macs Tabına geliyoruz .Sağdan “+” butonuna basarak devam ediyoruz.
FreeRadius_20
Kimlik doğrulamasının otomatik olarak mac adresi üzerinden yapılmasını istediğimiz bilgisayarın mac bilgilerini (:) yerine çizgiler (-) ayırarak yazıyoruz.
FreeRadius_21
Bu mac adresine sahip bilgisayar için kısıtlama yapmak istersek Kullanıcı(User) bölümünde açıklamış olduğum kısıtlama(internet trafiği download upload kotaları …vs) gibi menüler ve işlevleri aynı şekilde mac filtreleme için de geçerlidir.
Mac adresini yazıp save diyerek kayıt ettiğimizde Captive portal ekranı artık karşımıza gelmeyecek ve bu makine otomatik olarak internete çıkacaktır.
Bu kullanıcıyı captive portal üzerinde mac adresi ile görüntüleyeceksiniz buda mac doğrulamasından geçmiş olduğunu gösterecektir.
FreeRadius_22
Serdar BAYRAM

Pfsense Captive Portal and FreeRadius Entegration

Pfsense Captive Portal and FreeRadius Entegration

PfSense_FreeRadius
Hello friends,
This day we will be examining ku komuzu FreeRadius pfSense on installation and configuration.
In this paper;
  • What is Radius Server?
  • What is it based on how it is configured, and how pfSense FreeRadius
  • FreeRadius how to install and Captive Portal Integration.
  • We build on FreeRadius users download / upload quotas, mac … we’ll test as applying filtering applications.
First, let’s start with an introduction to what we do and that we will see in our discussion server.

What is Radius Server ? :
RADIUS (Remote Authentication Dial-iUser Service) is a protocol developed by Livingston Enterprise. RADIUS is based on client-server model and UDP protocol message exchange with gerçekleşir.freeradıus world’s most preferred open source RADIUS server is. Many ISPs company in the world uses the FreeRADIUS RADIUS server.
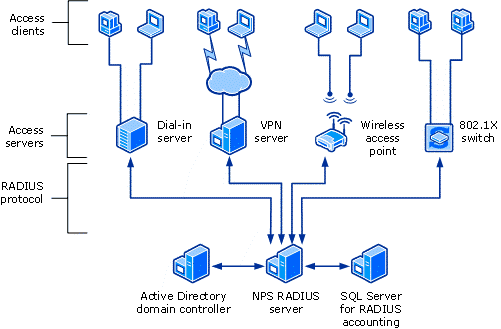
RADIUS is based on client-server model and is performed with the UDP protocol message exchange. Network Access Server (NAS), acts as a RADIUS user and passes user requests to the RADIUS server. Other RADIUS users wireless access point, routers, and switches may be. After receiving requests from users has a RADIUS server for authentication, authorization, and accounting (AAA) performs the operation. RADIUS (Remote Authentication Dial-in User Service) server user name-password authentication for users who connect remotely (authentication), reporting / access time (accounting) and authorization (authorization) makes the process user and performed in such a way that encrypted communication with the private key from the server, so that the password never sent over the network. According to this user, and server security methods it has been configured before communication, and connection is terminated if the passwords do not match. RADIUS servers different database (eg SQL, LDAP) authentication method that can be integrated.
          For example, workplace, this structure can be used to connect to the corporate network from outside users for individual authorization can .For are used by many Internet service providers to set up a central control to be able to open accounts and authorization to their user can be used in all of the desired network. Wide Wi-Fi (wireless) is also frequently used in networking.
            RADIUS servers authentication / authorization process makes. RADIUS can have its own local database or external database. Local database of users in the native users (local users) is called.
The RADIUS servers can act as a proxy server, so the response from the RADIUS server for incoming requests to other RADIUS servers can communicate by passing back to the RADIUS users. Its ability to act as a proxy server to connect to two separate Internet provider provides a one of. Standard RADIUS uses UDP as the first port 1645 and 1646 for authentication and accounting packages. But then, the group has appointed RADIUS standard ports 1812 and 1813, but the company still uses a lot more protein 1645/1646. There RADIUS IPv6 support.
RADIUS is based on UDP protocol. We will use the UDP ports 1812-1813 No. In this paper.
One free software developed for FreeRADIUS RADIUS. As a part of what you can do with this software:
  • People can be made on the basis of the authorization.
  • Groups identified, different access rights can be given.
  • The introduction of the registration may be made.
  • The system can display the list of users connected at that moment.
  • Single users may be prevented from making two connections at the same time. You can not Captiva in the portal!
  • It supports proxying
FreeRADIUS can run on the following operating systems:AIX, Cygwin, FreeBSD, HP-UX, Linux (CentOS, Debian, Mandriva, RedHat, SUSE, Turbolinux, Ubuntu), Mac OSX, NetBSD, OpenBSD, OSF/Unix, Solaris.
Freeradius_diagram
Now we can go to configure for the installation.
1-)First we build our pfSense SEARCH FreeRadius Pack 2 for it
System –> Package We’re now watching the installation options, and we’re finding here freeradius2 package.
FreeRadius_01
Services under the Options menu you will see FreeRadius After this process to take place immediately if it was on your system, please restart your firewall pfSense under this menu.
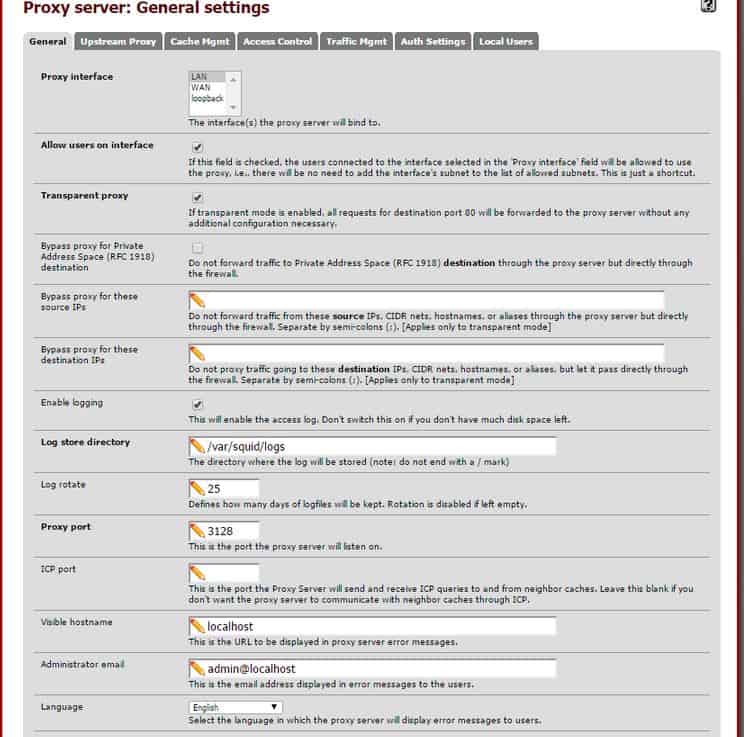
2-) First, the setting is as follows: we check our proxy servers.
FreeRadius_02
Let’s make sure that it appears as follows: Subnet access our information in the Control tab.
FreeRadius_03
Let’s go check that out of our machines to the internet After configuring these settings if our proxy servers on the Internet, we can follow the following steps if we are working smoothly.
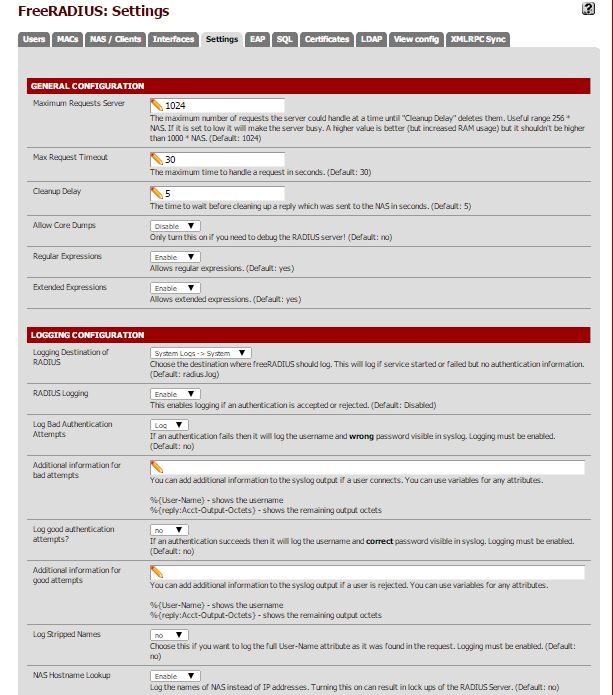
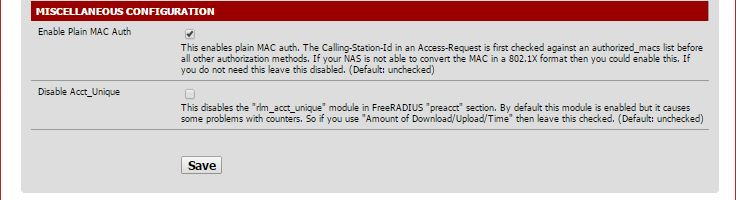
3-)  Servers –>FreeRadius Selecting our passing to configure RADIUS server. We continue following the Logging option enabled by
FreeRadius_04
Place the bottom of the page we bring the Enable checkbox to activate the MAC Auth. We do not make changes in value related to other departments, we record in this state.
FreeRadius_05
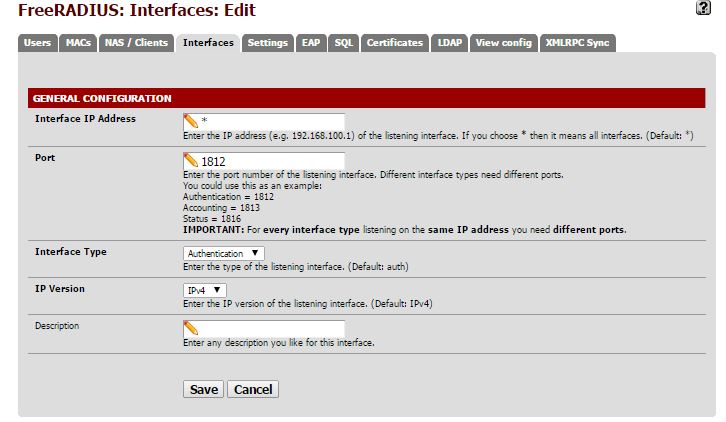
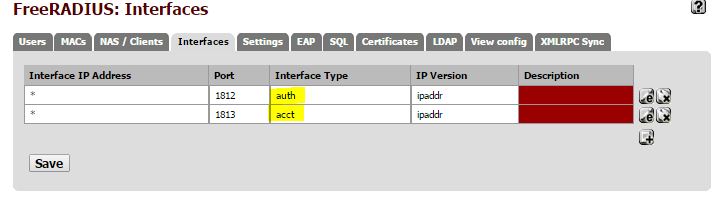
4-)FreeRadius –> Interfaces We’re going to base and press + or RADIUS server, we open our ports are used.
FreeRadius_06
Authentication port for 1812-1813 proposed to us are opening the account verification, etc.
FreeRadius_07
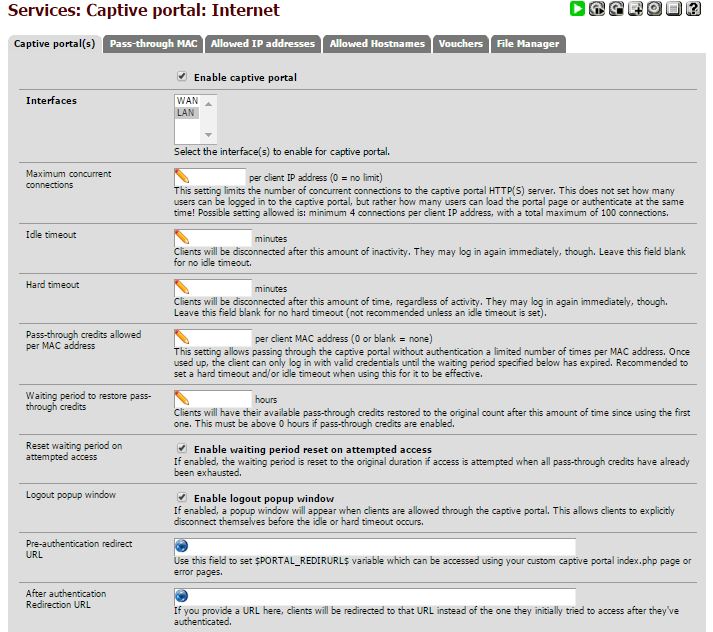
5-)Server–>Captive Portal I follow the option and I define a zone for captive portals (I explained this step in a previous article.) And we Captive portal is enabled.
FreeRadius_08
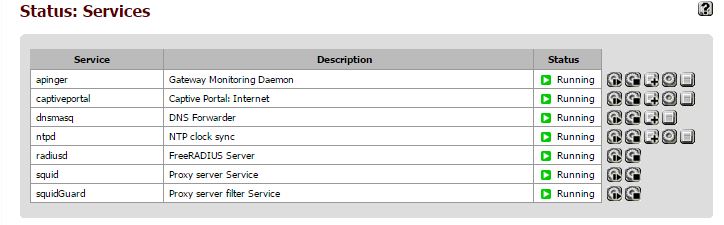
Status –> Services Viewing saying we are running our service.
Here we see that soon we will try our captive portal service on the Radius server definition for captive portals.
FreeRadius_09
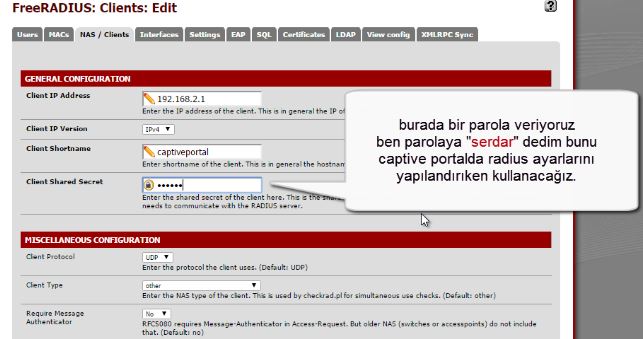
6-)FreeRadius –>NAS/Clients We come to the tab as follows
Client ip address: This section of the IP address of the server’s firewall pfSense
Client Shortname: This section just before we enter the name of the captive portal server, you see the above operability
Client Shared Secret : We are entering a password, no characters in tr If this section.
FreeRadius_10
Save record saying that after we have done this.
7-) Rank User to Radius Server (User) came here to create an account to kısıtlayabilmekt a lot about the user that you create in this section now examine the part related to the user.
FreeRadisu –>User We press the + button and tabındayk the right to come before us to add a new user screen.
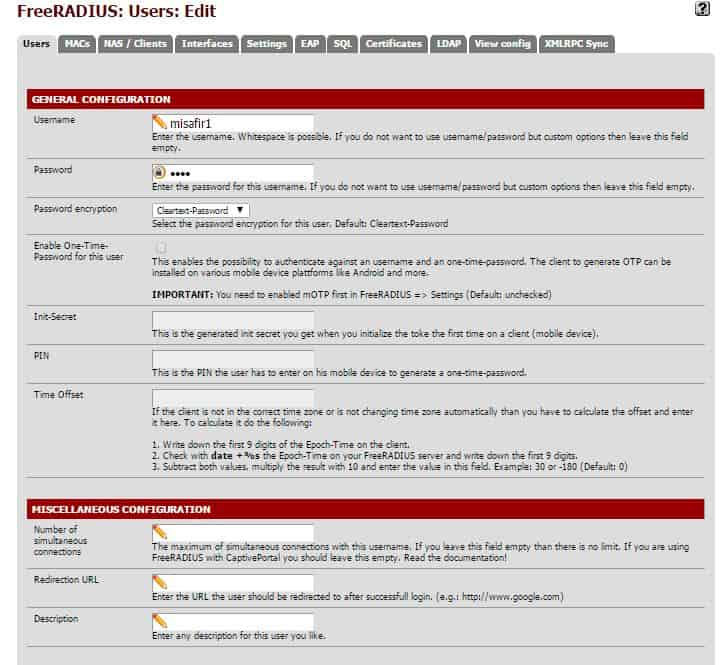
The following screen
FreeRadius_11
GENERAL CONFIGURATION
Username :username will be defined
Password : We set a password for the user account
Password encryption : MD5 here whether changing the format if you wish, you can give a 128-bit encryption for encryption.
Enable one-Time :If you select the user account that can access the Internet means that this password only once. When you enable this option following
Init-Secret PIN, Time Offset options are active.
MISCELLANEOUS CONFIGURATION
Number of simultaneous connections : Using this account information with this option, we specify how many users can use the internet simultaneously.
Redirection URL :the site you enter herehttp://www.serdarbayram.net wishing to enter the site name in the format you will first have direct Internet users to this page
Description : You can enter here the explanation of the user.
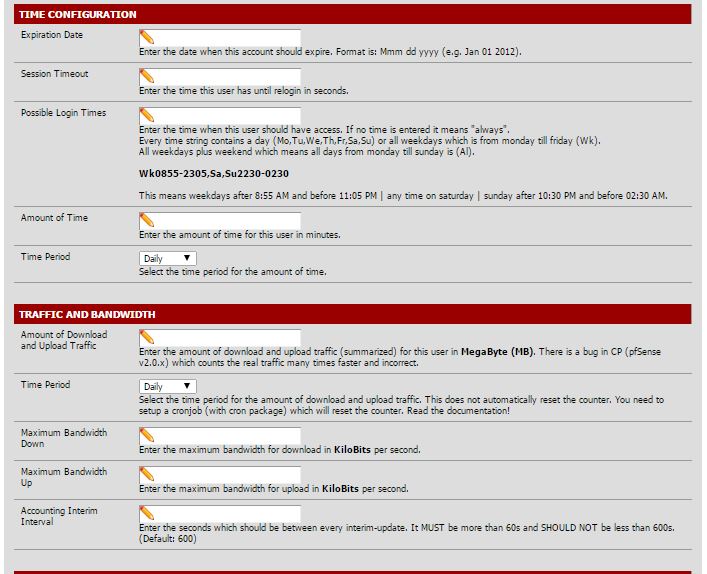
FreeRadius_12
TIME CONFIGURATION
Expiration Date :Here we enter the user account of the most recent information which can be used till date.
  For example: We have to go in the format specified by us as Novi 12.2014.
Session Timeout : The user can use the Internet until the specified time
Possible Login Times :Here’s the format in which it was mentioned to us allows us to determine which days between the hours could enter the internet.
Amount of Time :The connection here then entered moment for a user account if the user cuts remains to login with the user information again.
Time Period :You can determine this information daily weekly monthly
Example: Recognize the right of users to access the Internet daily for 2 hours weekly as you may think you do here will be entitled to 2 hours of internet per week.
TRAFFIC AND BANDWIDTH
Amount of Download and Upload Traffic : Upload and download quotas for restricted user account, you can put the values you enter must be in MB.
Time Perio : You can determine this information daily weekly monthly.
Maximum Bandwidth Dow : Max can specify the download quota.
Maximum Bandwidth Up : You can set the max upload quota.
8)Radius server to identify your user account on and now Server –> Captive Portal option to let go and Captive portal on the Radius Server configuration settings.
We open our captive portal, and we are coming to the Authentication Department.
FreeRadius_13
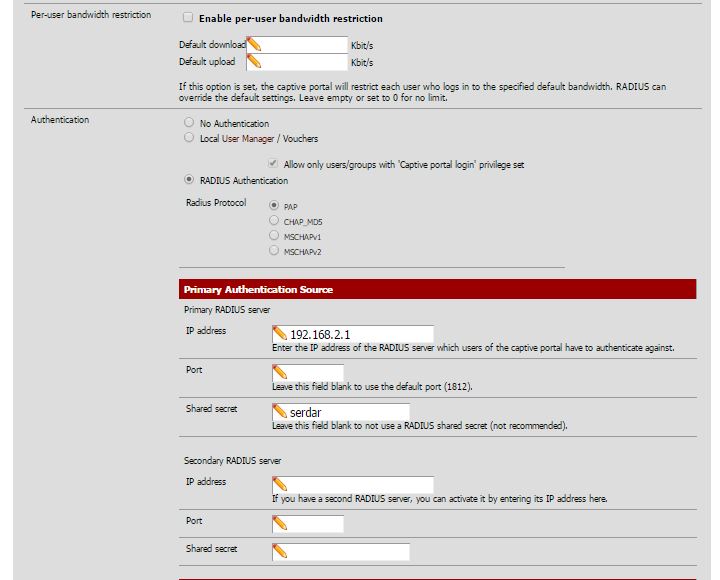
İp address : We are entering this section of the Radius server’s ip address
Shared secret : We’re going to share here is that we have identified as key to the Radius server.
Secondary Authentication Source : bölümünde eğer 2. Bir Radius serverınız yok ise bu alanı boş bırakıyorsunuz.
FreeRadius_14
In the bottom of the page we organize images taking into account the area marked with yellow.
Radius Options 
Mac Authentication secret için :We are entering the password we set the Radius server.
Radius NAS IP attribute :We are entering our part of the local ip address
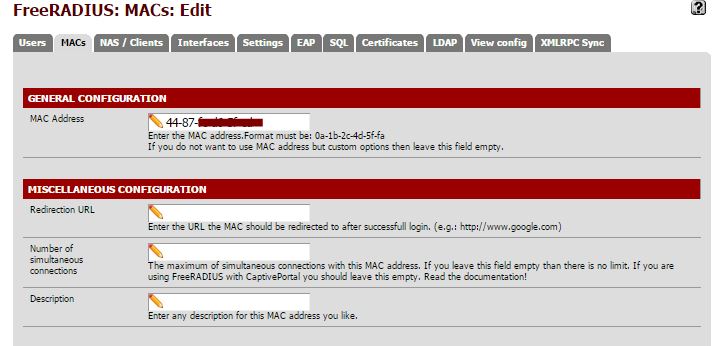
Mac address in this format, we need to choose the high school IETF format Mac Address Format “-” (dash) by dedicating.
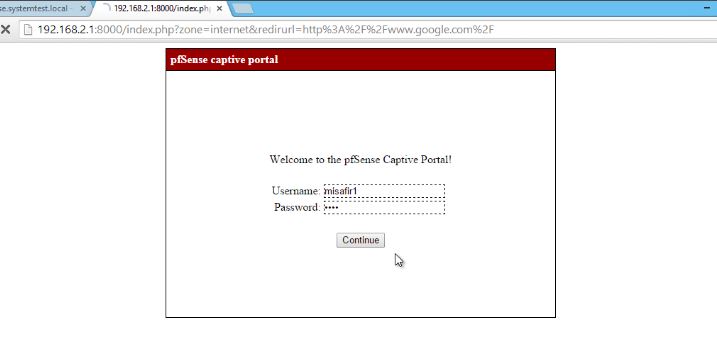
9-) Now we have completed our Radius server i necessary step for now we try to go to the internet from a machine on your network greets us captive portal login page.
I’m here in the Radius server entry with guest users I’ve created
FreeRadius_15
Captive portal lead us.
FreeRadius_16
Yes, now we can go to the internet through the Captive portal and Radius server authentication.
FreeRadius_17
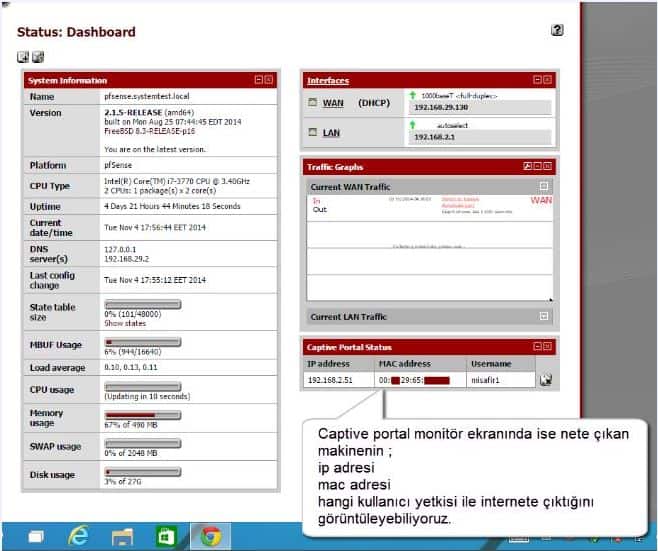
Now you’re looking at the screen Captive portal monitoring görüntüleyel who is using the Internet.
FreeRadius_019
As you can see in the screenshot now all the internet users
  • ip address
  • Mac Address
  • User Names
Press the button to display the user’s connection times you want to cut across the Appeal connection you can take from the system.
10-) If users want to go to the net from the encounter with the captive portal while welcoming address to the internet!
We need to make the Mac authentication for this operation;
first look through the portal user name We note captive somewhere and then the mac address
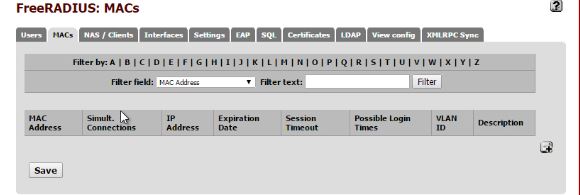
Server –>Free Radius –> Macs We come from Taba to .Sağ “+” button to continue.
FreeRadius_20
Mac mac address authentication information automatically through the computer we want to be (:) instead of dashes (-) are writing separated.
FreeRadius_21
If we want to restrictions on computer with this MAC address user (User) part I have explained the restrictions (download upload quotas internet traffic … etc), such as menus and functions are the same goes for the mac filtering.
When we wrote the record saying saver Mac address Captive portal screen will now come before us and the machine will automatically go to the internet.
This user will display the MAC address on the captive portal prune history will show that the MAC verification.
FreeRadius_22
Serdar BAYRAM