Pfsense Captive Portal and FreeRadius Entegration

Hello friends,
This day we will be examining ku komuzu FreeRadius pfSense on installation and configuration.
In this paper;
- What is Radius Server?
- What is it based on how it is configured, and how pfSense FreeRadius
- FreeRadius how to install and Captive Portal Integration.
- We build on FreeRadius users download / upload quotas, mac … we’ll test as applying filtering applications.
First, let’s start with an introduction to what we do and that we will see in our discussion server.
What is Radius Server ? :
RADIUS (Remote Authentication Dial-in User Service) is a protocol developed by Livingston Enterprise. RADIUS is based on client-server model and UDP protocol message exchange with gerçekleşir.freeradıus world’s most preferred open source RADIUS server is. Many ISPs company in the world uses the FreeRADIUS RADIUS server.
RADIUS is based on client-server model and is performed with the UDP protocol message exchange. Network Access Server (NAS), acts as a RADIUS user and passes user requests to the RADIUS server. Other RADIUS users wireless access point, routers, and switches may be. After receiving requests from users has a RADIUS server for authentication, authorization, and accounting (AAA) performs the operation. RADIUS (Remote Authentication Dial-in User Service) server user name-password authentication for users who connect remotely (authentication), reporting / access time (accounting) and authorization (authorization) makes the process user and performed in such a way that encrypted communication with the private key from the server, so that the password never sent over the network. According to this user, and server security methods it has been configured before communication, and connection is terminated if the passwords do not match. RADIUS servers different database (eg SQL, LDAP) authentication method that can be integrated.
RADIUS is based on client-server model and is performed with the UDP protocol message exchange. Network Access Server (NAS), acts as a RADIUS user and passes user requests to the RADIUS server. Other RADIUS users wireless access point, routers, and switches may be. After receiving requests from users has a RADIUS server for authentication, authorization, and accounting (AAA) performs the operation. RADIUS (Remote Authentication Dial-in User Service) server user name-password authentication for users who connect remotely (authentication), reporting / access time (accounting) and authorization (authorization) makes the process user and performed in such a way that encrypted communication with the private key from the server, so that the password never sent over the network. According to this user, and server security methods it has been configured before communication, and connection is terminated if the passwords do not match. RADIUS servers different database (eg SQL, LDAP) authentication method that can be integrated.
For example, workplace, this structure can be used to connect to the corporate network from outside users for individual authorization can .For are used by many Internet service providers to set up a central control to be able to open accounts and authorization to their user can be used in all of the desired network. Wide Wi-Fi (wireless) is also frequently used in networking.
RADIUS servers authentication / authorization process makes. RADIUS can have its own local database or external database. Local database of users in the native users (local users) is called.
The RADIUS servers can act as a proxy server, so the response from the RADIUS server for incoming requests to other RADIUS servers can communicate by passing back to the RADIUS users. Its ability to act as a proxy server to connect to two separate Internet provider provides a one of. Standard RADIUS uses UDP as the first port 1645 and 1646 for authentication and accounting packages. But then, the group has appointed RADIUS standard ports 1812 and 1813, but the company still uses a lot more protein 1645/1646. There RADIUS IPv6 support.
RADIUS is based on UDP protocol. We will use the UDP ports 1812-1813 No. In this paper.
One free software developed for FreeRADIUS RADIUS. As a part of what you can do with this software:
- People can be made on the basis of the authorization.
- Groups identified, different access rights can be given.
- The introduction of the registration may be made.
- The system can display the list of users connected at that moment.
- Single users may be prevented from making two connections at the same time. You can not Captiva in the portal!
- It supports proxying
FreeRADIUS can run on the following operating systems:AIX, Cygwin, FreeBSD, HP-UX, Linux (CentOS, Debian, Mandriva, RedHat, SUSE, Turbolinux, Ubuntu), Mac OSX, NetBSD, OpenBSD, OSF/Unix, Solaris.
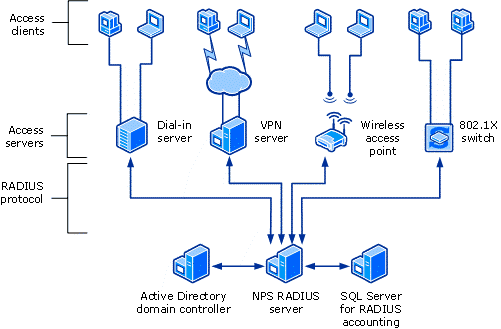
Now we can go to configure for the installation.
1-)First we build our pfSense SEARCH FreeRadius Pack 2 for it
System –> Package We’re now watching the installation options, and we’re finding here freeradius2 package.

Services under the Options menu you will see FreeRadius After this process to take place immediately if it was on your system, please restart your firewall pfSense under this menu.
2-) First, the setting is as follows: we check our proxy servers.
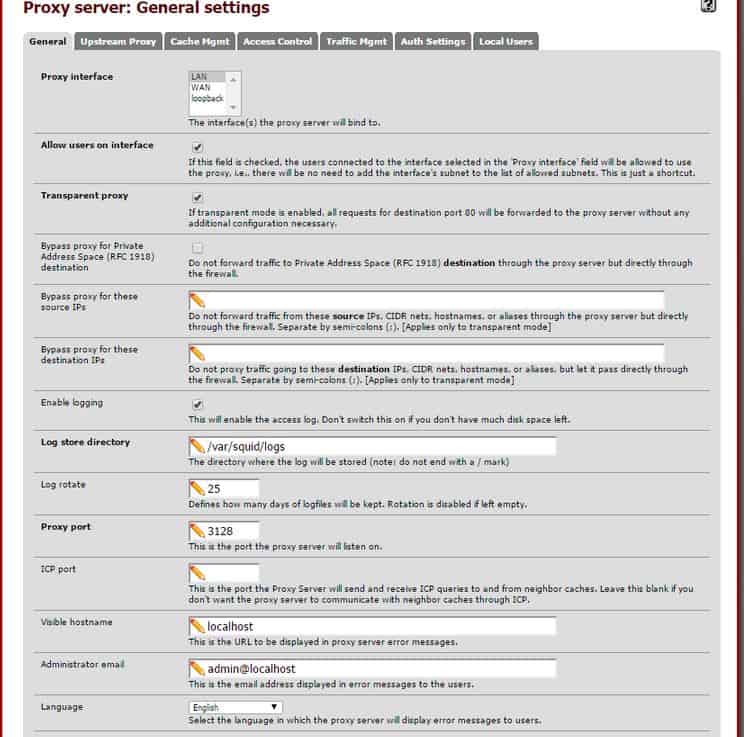
Let’s make sure that it appears as follows: Subnet access our information in the Control tab.
Let’s go check that out of our machines to the internet After configuring these settings if our proxy servers on the Internet, we can follow the following steps if we are working smoothly.
3-) Servers –>FreeRadius Selecting our passing to configure RADIUS server. We continue following the Logging option enabled by
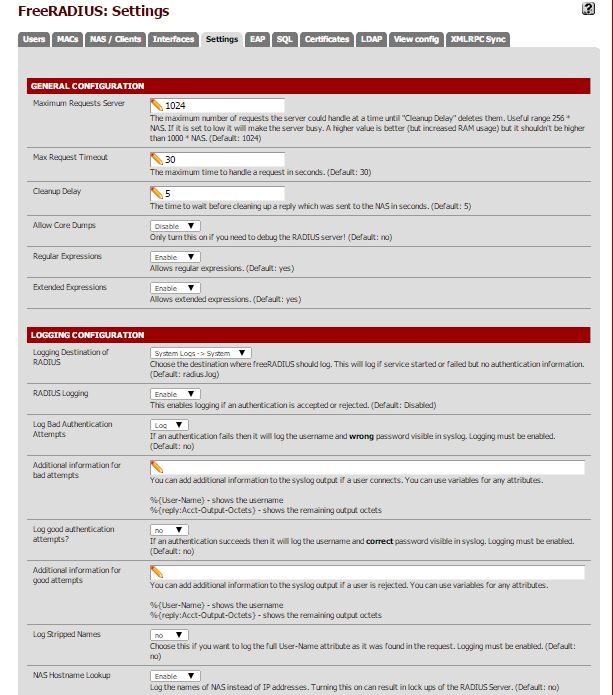
Place the bottom of the page we bring the Enable checkbox to activate the MAC Auth. We do not make changes in value related to other departments, we record in this state.

4-)FreeRadius –> Interfaces We’re going to base and press + or RADIUS server, we open our ports are used.
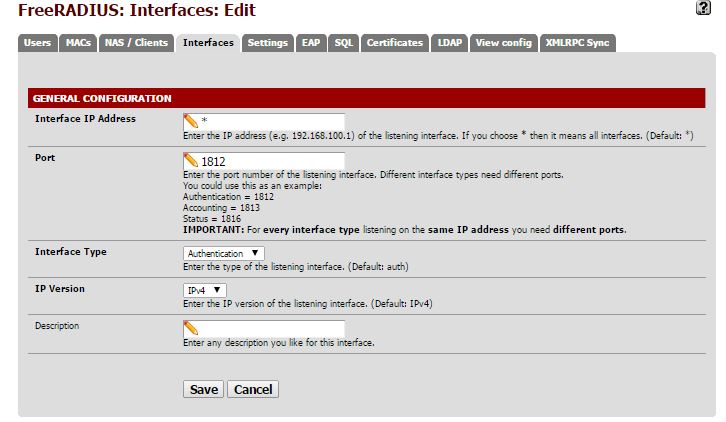
Authentication port for 1812-1813 proposed to us are opening the account verification, etc.

5-)Server–>Captive Portal I follow the option and I define a zone for captive portals (I explained this step in a previous article.) And we Captive portal is enabled.
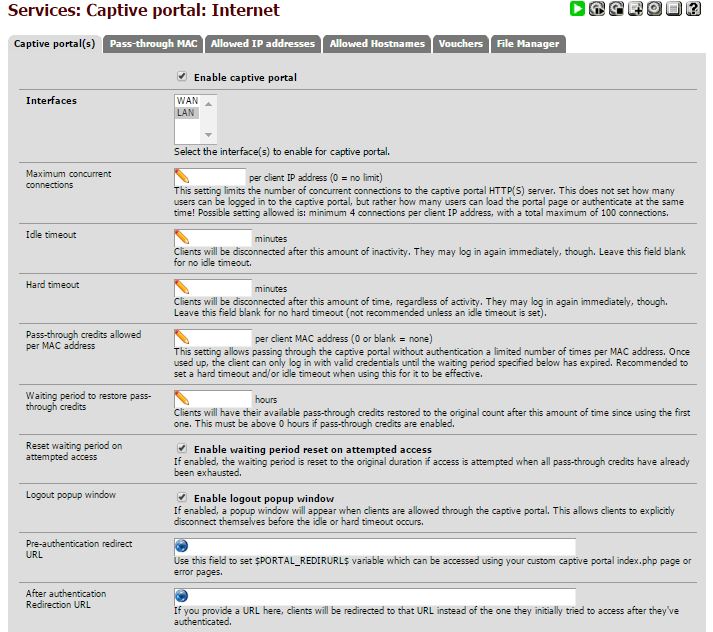
Status –> Services Viewing saying we are running our service.
Here we see that soon we will try our captive portal service on the Radius server definition for captive portals.
Here we see that soon we will try our captive portal service on the Radius server definition for captive portals.

6-)FreeRadius –>NAS/Clients We come to the tab as follows
Client ip address: This section of the IP address of the server’s firewall pfSense
Client Shortname: This section just before we enter the name of the captive portal server, you see the above operability
Client Shared Secret : We are entering a password, no characters in tr If this section.
Client Shortname: This section just before we enter the name of the captive portal server, you see the above operability
Client Shared Secret : We are entering a password, no characters in tr If this section.
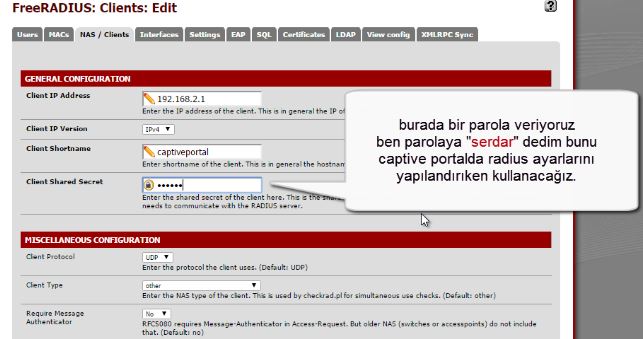
Save record saying that after we have done this.
7-) Rank User to Radius Server (User) came here to create an account to kısıtlayabilmekt a lot about the user that you create in this section now examine the part related to the user.
FreeRadisu –>User We press the + button and tabındayk the right to come before us to add a new user screen.
The following screen
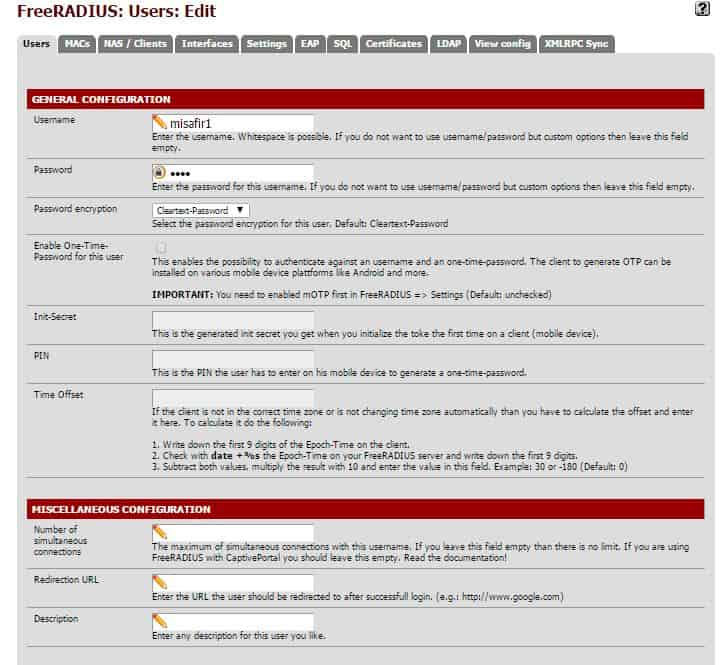
GENERAL CONFIGURATION
Username :username will be defined
Password : We set a password for the user account
Password encryption : MD5 here whether changing the format if you wish, you can give a 128-bit encryption for encryption.
Enable one-Time :If you select the user account that can access the Internet means that this password only once. When you enable this option following
Init-Secret PIN, Time Offset options are active.
MISCELLANEOUS CONFIGURATION
Number of simultaneous connections : Using this account information with this option, we specify how many users can use the internet simultaneously.
Redirection URL :the site you enter herehttp://www.serdarbayram.net wishing to enter the site name in the format you will first have direct Internet users to this page
Description : You can enter here the explanation of the user.
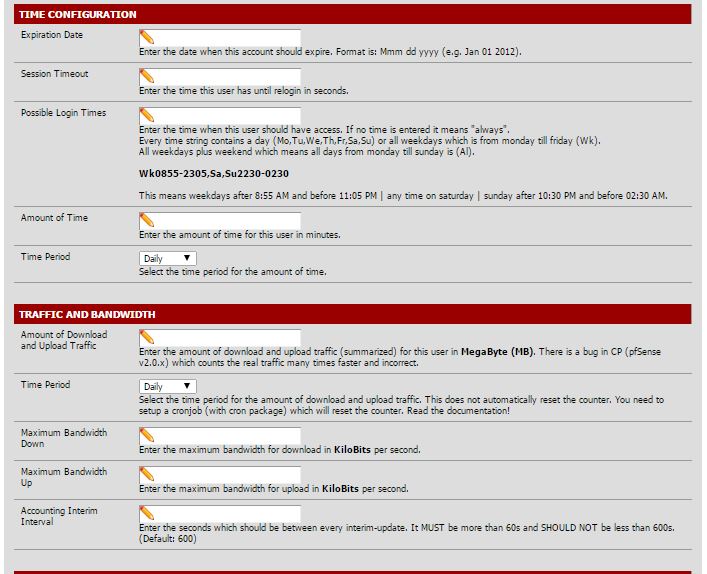
TIME CONFIGURATION
Expiration Date :Here we enter the user account of the most recent information which can be used till date.
For example: We have to go in the format specified by us as Novi 12.2014.
Session Timeout : The user can use the Internet until the specified time
Possible Login Times :Here’s the format in which it was mentioned to us allows us to determine which days between the hours could enter the internet.
Amount of Time :The connection here then entered moment for a user account if the user cuts remains to login with the user information again.
Time Period :You can determine this information daily weekly monthly
Example: Recognize the right of users to access the Internet daily for 2 hours weekly as you may think you do here will be entitled to 2 hours of internet per week.
TRAFFIC AND BANDWIDTH
Amount of Download and Upload Traffic : Upload and download quotas for restricted user account, you can put the values you enter must be in MB.
Time Perio : You can determine this information daily weekly monthly.
Maximum Bandwidth Dow : Max can specify the download quota.
Maximum Bandwidth Up : You can set the max upload quota.
8)Radius server to identify your user account on and now Server –> Captive Portal option to let go and Captive portal on the Radius Server configuration settings.
We open our captive portal, and we are coming to the Authentication Department.
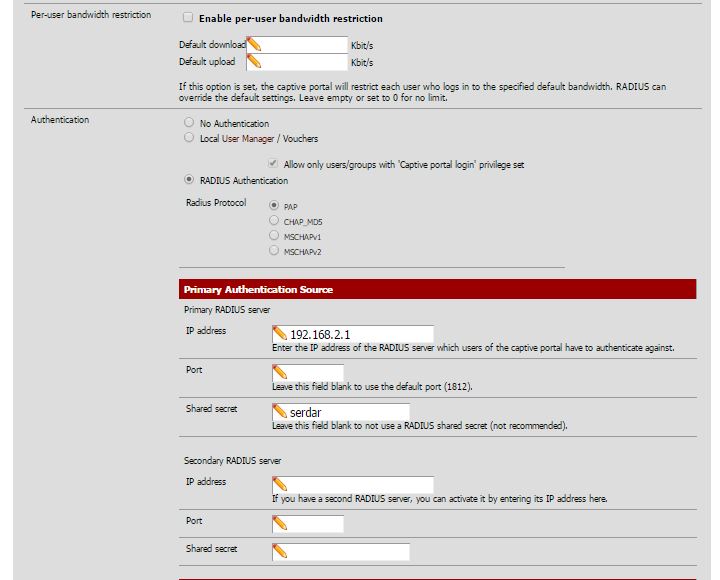
İp address : We are entering this section of the Radius server’s ip address
Shared secret : We’re going to share here is that we have identified as key to the Radius server.
Secondary Authentication Source : bölümünde eğer 2. Bir Radius serverınız yok ise bu alanı boş bırakıyorsunuz.
In the bottom of the page we organize images taking into account the area marked with yellow.
Radius Options
Mac Authentication secret için :We are entering the password we set the Radius server.
Radius NAS IP attribute :We are entering our part of the local ip address
Mac address in this format, we need to choose the high school IETF format Mac Address Format “-” (dash) by dedicating.
9-) Now we have completed our Radius server i necessary step for now we try to go to the internet from a machine on your network greets us captive portal login page.
I’m here in the Radius server entry with guest users I’ve created
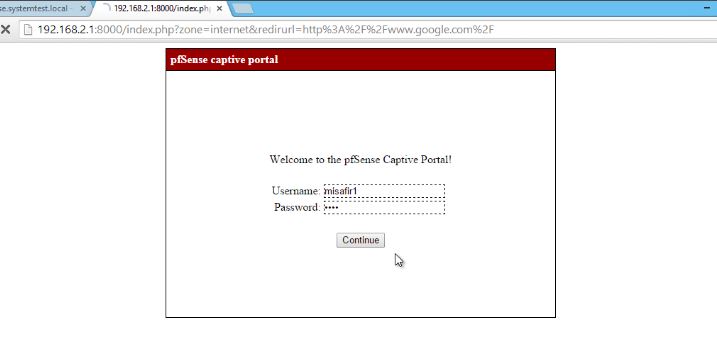
Captive portal lead us.
Yes, now we can go to the internet through the Captive portal and Radius server authentication.
Now you’re looking at the screen Captive portal monitoring görüntüleyel who is using the Internet.
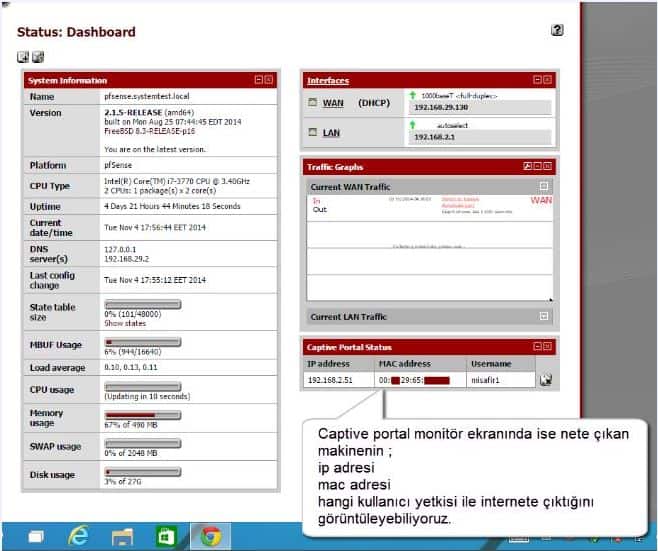
As you can see in the screenshot now all the internet users
- ip address
- Mac Address
- User Names
Press the button to display the user’s connection times you want to cut across the Appeal connection you can take from the system.
10-) If users want to go to the net from the encounter with the captive portal while welcoming address to the internet!
We need to make the Mac authentication for this operation;
first look through the portal user name We note captive somewhere and then the mac address
Server –>Free Radius –> Macs We come from Taba to .Sağ “+” button to continue.
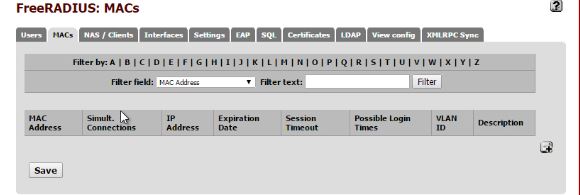
Mac mac address authentication information automatically through the computer we want to be (:) instead of dashes (-) are writing separated.
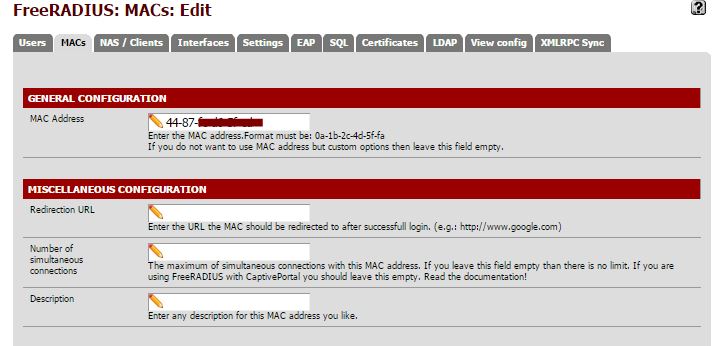
If we want to restrictions on computer with this MAC address user (User) part I have explained the restrictions (download upload quotas internet traffic … etc), such as menus and functions are the same goes for the mac filtering.
When we wrote the record saying saver Mac address Captive portal screen will now come before us and the machine will automatically go to the internet.
This user will display the MAC address on the captive portal prune history will show that the MAC verification.
Serdar BAYRAM


Hiç yorum yok:
Yorum Gönder